
Laboratory Design
Laboratory design is the first unit of this course. Understanding of laboratory design is necessary for all science teachers as health and safety of the students and staff working comes first. The design of the science lab includes infrastructure and setting of materials of science practical in a way that should provide safe, comfortable and efficient environment.
Laboratory design also includes facilities, storage of materials and chemicals, and management of pupils.
Different designs of laboratories of Science (Physics, Chemistry, Biology and computer science) are introduced in this unit.
OBJECTIVES
After reading this unit, it is hoped that you will be able to:
- familiarize with different designs of laboratories
- get awareness regarding facilities of laboratories such as water, heat and electricity
- store the equipment, materials and chemicals under your control more safely
- manage the students during teaching in laboratories.
1 Different Laboratory Designs
Lab design means structure and arrangement of different materials. The science laboratories designs vary to some extent on the basis of area, locations, weather, need of the society, and resources constrains. A large number of schools have well established science laboratories. Keeping in mind the trends of science subject, science teachers has to either establish new laboratories or renovate and modifies the existing laboratories. Most of the science teachers use designs of already existing laboratories. There are very less number of teachers who get a chance to design a new lab for their schools. Expert science teachers may use already existing designs with little modifications. Our science teachers will have to bring change or develop their own lab on the basis of changing trends. The design of the lab must foster scientific thinking and creativeness among the science students. Some laboratory designs are given below.
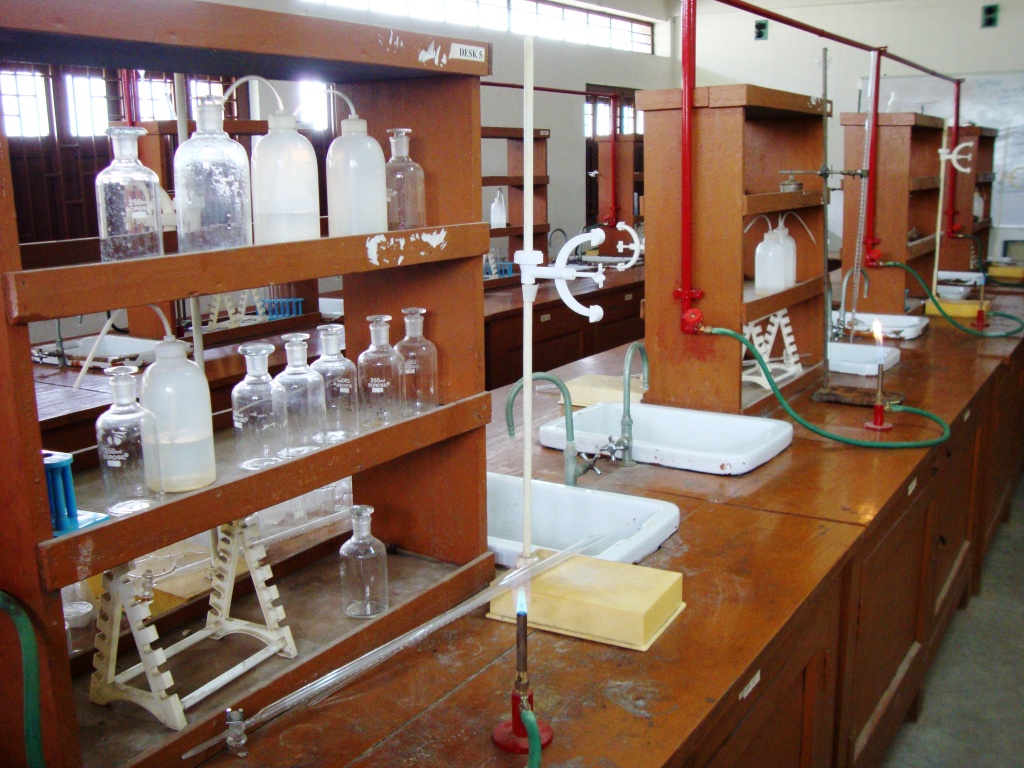
Fig. 1.1Chemistry Laboratory
Fig: 1.1a. Chemistry Laboratory at AIOU

Fig. 1.2 Biology Laboratory

Fig. 2a Biology Laboratory
Fig.3 Physics Laboratory

Fig.1.3a Physics Laboratory

Fig. 4 Integrated Science Laboratory
- Building of the Laboratory
Teaching of science without practicals is like a fish out of water. Practicals are conducted in science labs. Most of the schools already have a Science lab where science practicals are conducted; even then there are many schools where science laboratory is yet to be developed. There is a considerable number of schools where integrated science laboratory is used for practicals. Keeping the trends of science education throughout the world, management of subject laboratories will be discussed in unit No.2. Following aspects regarding building is necessary.
a) Number of Rooms for Laboratory
Usually each science subject laboratory comprises three rooms, in which one room is bigger where students perform the practicals. With this room two small rooms are constructed. One room is used by laboratory staff (Science teacher, laboratory assistant and laboratory attendant). Third room is mostly used as store room or keeping important record.
b) Location of the Laboratory
Most of the laboratories are built within the vicinity of the school. There are several schools where classroom are altered into laboratories. But science laboratories and classrooms have different requirements. Newly constructed science labs have been constructed outside the main building of the school. There are general recommendations for biology laboratory that it should be constructed near the park, students should come and go easily. Feasibility of the science lab is done by a number of experts. It also depends upon the resources and locality of the school.
c) Area of the Laboratory
Area of room of the laboratory depends:
- Population of science students at secondary level
- Nature of practicals and subject
- Number and size of demonstration tables and laboratory tables
- Space and place allocation for storage of materials, almirahs and shelves.
- Space allocation for ventillation
- Teacher has to walk among the students , available space during students at work
- Installation of fire extinguishers
- Water basins and fitting of water and gas pipes.
- Space for hanging of charts.
- Space allocation for keeping Models.
- Dustbin or waste box, especially in chemistry and biology labs.
- Trends in population and admissions in that school
d) Height of the Roof
Depending upon the weather conditions height varies to a little extent. For example, in colder, areas the roof should be considerable lower height, whereas in hotter areas the height of roof may be more than 10 ft. In cities, where energy crises don’t exist, the science labs may have considerable height.
e) Facilities
Following facilities should be available for proper practical activities in a laboratory.
i) Light: There should be a proper arrangement of light in laboratory. Alternative resources of light may also be available in case of shedding electric source.
ii) Air: Science laboratories should be airy, especially in chemistry and biology laboratories there should be proper arrangement of ventilation. There should be proper passages for crossing of air if there is less number of windows.
iii) Water: Water is very important facility used to wash hands and apparatus. in physics laboratory one or two basins of water must be installed, but in Chemistry and Biology each table should have a water basin.
iv) Water Drainage: It is unhygienic when water stays in laboratories. There should be a proper drainage system of water.
v) First aid Box: There should be a proper arrangement of first aid boxes having necessary medicines and bandages.
vi) Dustbin /Waste Box: During the experimentation lot of things are wasted. They should be put in dust bin and thrown out at proper time.
Self Assessment Exercises 1.1
Q.1: Draw a design for your own school laboratory and tell facilities available in it.
Q.2: Explore abilities required for a Science Teacher, for development of a new laboratory.
- Storage of Laboratory Equipment
Laboratory equipment includes all the apparatus which is used for performing experiments in the laboratory. Based on type and nature of subject and experiments the type of equipment varies. The equipment required for experiments of physics are different to that of chemistry and biology. Equipment in physics is metallic, whereas in chemistry and biology the equipment is made from glass. Most of the equipment is commonly used in all science subjects. In the text below let us try to read the types of equipments and their most appropriate storage.
In the subject of Biology following equipment are used at secondary level:
Microscope
Dissecting Microscope,
Magnetifying Lens
Dissecting Box
Oven and Incubator etc
All this equipment are stored in special boxes, labelled and placed in special glass almirahs.
In the subject of Physics, the list of equipment/apparatus can be seen from National Curriculum for Physics IX-X from page no.48-49.
The equipment /apparatus of physics is also stored at places where no rusting or corrosion take place. There is very less use of water and chemicals in physics laboratory, hence a little care and cleanliness is sufficient to keep the apparatus safe.
- Storage of Materials and Chemicals
There is a range of storage facilities suitable for chemicals in the laboratory environment. Several of these are specially designed for the safe storage of different types of hazardous substances. It is important to understand what substances can be safely stored in which storage container.
- Principles of Safe Storage
Three principles can be applied to help provide safe storage of laboratory chemicals.
Segregation
Separation and
Ventilation
- Other Aspects of Storage of Materials and Chemicals
Labelling
All chemical containers must be appropriately and clearly labelled with the following information:
Name of substance
Hazard category (e.g. corrosive, flammable, oxidizing, and toxic)
In situations, where there may be very small vessels or sample vials containing hazardous substances, such that individual labelling is not practicable, these should be secured within a secondary container such as a rack or tray which should then be labelled as above.
Compatibility
It is essential to segregate incompatible substances. The improper storage or mixing of chemicals can result in serious incidents and injuries.
|
Substance |
Not to be mixed with |
|---|---|
|
acetic acid |
nitric acid, chromic acid, peroxides, permanganates, perchloric acid, ethylene glycol, hydroxyl compounds |
|
Acetone |
concentrated sulphuric acid, nitric acid |
|
ammonium nitrate |
acids, metal powders, flammable liquids, chlorates, nitrates |
|
arsenic compounds |
reducing agents |
|
Azides |
Acids |
|
chlorates |
ammonium salts, acids, metal |
|
carbon, activated |
calcium hypochlorite, oxidising agents |
|
flammable liquids |
ammonium nitrate, chromic acid, hydrogen peroxide, nitric acid, sodium peroxide |
|
hydrocarbons (e.g. benzene) |
fluorine, chlorine, bromine, chromic acid, peroxides |
|
hydrofluoric acid |
aqueous and anhydrous ammonia |
|
dimethylsulphoxide (DMSO) |
strong oxidising agents / bases / acids |
|
hydrogen peroxide |
most metals or their salts, flammable liquids, combustible material |
|
nitric acid |
acetic acid, aniline, chromic acid, flammable liquids / gases |
|
perchloric acid |
acetic acid, alcohol, combustible materials (e.g. wood / paper) |
|
peroxides |
acids, avoid friction or shock, store cold |
|
potassium permanganate |
glycerin, ethylene glycol, sulphuric acid, benzaldehyde |
|
sulphuric acid |
chlorates, perchlorates, permanganates |
Table 1.1 Incompatible Chemicals
Source: Department of Biology, University of York, Wentworth Way, York, YO10 5DD, UK
Tel: work01904 328500 | Fax: fax01904 328505 |
- Minimise quantities. Store the minimum stock levels of hazardous materials that is reasonable for the level of usage in the lab. Large quantities of hazardous materials should be stored in purpose built external chemical stores.
- Maintain good housekeeping. As in all work areas, clutter should be kept to a minimum on general shelving as well as in storage cabinets/cupboards.
- Maintain good stock control and be aware of time-sensitive compounds such as ethers which once opened and exposed to the air can produce peroxides which are highly explosive. This means a regular review of what is being stored and disposal of surplus or unwanted chemicals. Pay attention to expiry dates and the date when a bottle is first opened should be clearly shown on the label.
- Do not store chemicals under sinks as they may leak and some chemicals react when wet.
- Store large breakable containers, particularly of liquids, below shoulder height. Storage of other materials e.g. plastic containers, above this height is acceptable provided that there is a safe means of access to the storage location
- Sensible shelf storage – ensure shelves are not so high that workers need to access them via the benches or lab chairs. Keep light and/or infrequently used containers on the higher shelves. Lips on shelves are helpful as is ensuring that Safety Office chemicals stored on shelves over the centre of the bench, cannot be pushed back and fall off the far side.
- Items in cabinets should be stored on trays, whether the trays be integral to the storage cabinet or are additional.
3. Where to Store the Chemicals
The following principles should be followed in relation to storage on shelves
- Do not overload shelves – if they are bowed they are overloaded.
- Store breakable containers, particularly of liquid and hazardous chemicals below shoulder height.
· Store large heavy containers at low level
· Where items are stored above this level ensure they are light weight/infrequently used and that there is a safe means of access e.g. step stool or ladders.
Acid cabinets
Modern versions are made of acid resistant materials [such as polypropylene, HDPE or wood] and contain a tray to catch any leakage or spillage. Wooden cabinets should not be used for storage of oxidising acids such as nitric or perchloric.
Ventilated cabinets
These are cabinets which are fitted with forced ventilation. They may be free-standing with their own extract system, or may be situated beneath a fume cupboard and attached to its duct. They are designed to safely store chemicals that give off noxious fumes and smells. These fumes are sucked away by the forced ventilation.
Fridges & freezers
May be used for storage of certain hazardous substances however where the substances are flammable the unit must not contain any internal light source or thermostat that could provide a source of ignition for any flammable vapour. Proprietary laboratory fridges and freezers that meet these requirements are available from major lab supply companies, domestic appliances should be avoided.
4. Storage of Different Materials
Acids - Concentrated acids must be safely stored inside a suitable cabinet as detailed above. Small quantities of dilute acids, such as used with pH meters, may be stored on the bench providing they are appropriately labelled. Fuming acids, acids chlorides should be stored in ventilated enclosures.
Incompatibles: Alkalis & Flammable liquids are incompatible with acids and must be stored separately.
Alkalis - Even although these materials are marked with a corrosive label, as are acids, they must be stored separately from acids since any accidental mixing of the concentrated materials will generate large quantities of heat and fumes.
Flammable solvents - (e.g. alcohols, toluene, hexane etc.) should only be stored in specialized flammable solvent cabinets as detailed above. Such cabinets must be clearly labelled and positioned away from doors or other means of escape from the laboratory.
- Storage of Equipments
Laboratory staff must have a sense of storage of materials in laboratory for the purpose of longer use and keep the things usable. Lets us discuss some materials and their storage as follows.
Thermometers:
Thermometers are fragile, the bulbs are thin and easily breakable; therefore they must be stored in their casings. Sometimes the mercury thread breaks leaving a part of thread in the stem. To join up the thread again, heat the bulb of the thermometer in an oil bath until the mercury thread reaches the top and joins up allow the thermometer to cool.
Chemical Balance
Most schools have double pan or with dial-o-gram balance. Double pan balance are kept in glass case which reduce exposure to corrosive fumes and dust, and also serve to protect the balance from air- draft during weighing. If balances are without glass cases, large plastic bags are recommended.
Tripod Stand:
Tripod stands become scaly after prolonged usage. When left unmaintained the scales drop off messing up the storage space as well as the bench top when they are being used. Chip off the scales with a cold chisel and rub down to bare metal with sandpaper.
Retort Stands
Retort stands are rapidly corroded by acid and chemical spillages. The usual maintenance work like cleaning with sand paper and painting must be carried out regularly.
Retort clamps are trouble- free; however, they must be lubricated periodically to ensure smooth turning of the butterfly bolt. The rubber tubing on the clamp is worn-out or burnt sometimes, and then gets them replaced.
Cork Borers
These are made of brass tubes. The edges are blunted easily. It is bad practice to heat up a cork borer in a Bunsen flame and then use it to bore holes in rubber bungs. This softens the borer and rubber reside inside the borer will prevent a clean cut subsequent cork boring. It is best by using a sharp borer and bore slowly, applying soap solution now and then.
Burettes and Pipettes:
The normal practice is to keep acids sin the burette. Most burettes have rubber tubing, clip and glass jet attachments. The rubber tubing tends to become plastic after prolonged use, then it is time to change them. With stop- cock burettes regular greasing is recommended in order to prevent jammed –cock.
Morter and Pestle
Often a porcelain mortar and pestle can get stained by chemicals. To remove the stains, pour a mixture of equal volumes of concentrated nitric acid and hydrochloric acid into the mortar, put in the pestle. Let them stand for a few hours, and then wash off with water.
Microscopes
Microscopes are precision instruments and they are fragile. Students must be carefully trained in the proper use of microscopes. Keeping microscope in boxes with packets of activated moisture absorbing silica gel helps to prevent mould formation. Dirty objectives and eyepieces are cleaned with lens paper, not tissues or cloth, to prevent scratching of the lenses. Students should be taught to clean the eyepiece, objective and the stages of the light condenser system before and after the experiment.
Magnifying Lenses or Glasses: It is common practice to keep those small items in trays or boxes. This storage method can result in scratches on the lenses. A better method is to place the lenses in slots cut in polystyrene blocks. This also provides a quick way of checking whether ail the lenses are present or not. Dirty hard lenses should be cleaned with lens paper before storage.
Slides and Slide Boxes: Slides should be arranged into categories and labeled. They are best kept in slide boxes. These boxes with slots will prevent scratching of the slides while in storage. An index is necessary. An indexed slide box can provide a very useful method of storage. Slides which have been used in a laboratory class need through cleaning with tissue before storing.
Cover slips although expendable are not cheap, and with care can be used again and again. A good idea is to store cleaned cover slips in a small jar of methylated spirit. They can be taken out with forceps and the alcohol dries quickly in the atmosphere.
Dissection Box: The instruments are usually kept in plastic cases. Used instruments should be cleaned and dried before storing, this prevent rusting of the instruments. Rusty instruments are cleaned with fine emery paper and then lightly greased. Instruments which have become blunt need sharpening on oil stone.
Wax Trays: Wax trays are usually made to galvanized iron sheet. When the trays are rusty, carry out maintenance work.The wax surface must be cleaned with water after dissection exercise; and when the wax surface is spoilt by excessive in sections or dissecting pins, heat the tray on an electric hot plate or over heated wire gauze until the wax melts. Use fine wire gauze or wire mesh to scrape off dirt, then allow to rest.
Self Assessment Exercise 1.2
Q.1: Give your comments for storage of laboratory materials, in your laboratory.
Q.2: What will you do when a Vernier Caliper, Tripod Stands and two pan stand get rusted ?
Q.3: What strategy will you use to save the scaling on different instruments of lab.
Q.4: Critically review principles for storage of Chemicals in laboratory?
Q.5: Enlist more careful storage techniques of chemicals in the laboratory.
- Management of Pupils
This is the important part for the teacher to decide now the pupils work in the laboratory. The features of four different methods of distribution the teacher is trying out are as follows:
- Everything on the teacher’s bench
All the apparatus and materials are laid out on the teacher’s bench and trolley. The pupils from two queues one for apparatus, the other for materials. Afterwards one pupil from each pair come up to collect the first substance.
- Previous distributions around the laboratory
The apparatus and materials have already been put in racks and distributed at four points around the front and side benches together with two substances at each point. The pupil collects the apparatus and materials from the racks one by one. The teacher moves round lighting Bunsen’s.
- Using monitors
The Bunsen’s and mats are in the pupil’s bench cupboards. Monitors light bunens, distribute the test-tube racks and holders and the first substance which has already been put in the test-tube.
- Teacher Distribution
All the materials and apparatus are on the teacher’s bench and adjacent trolley. The pupils queue to collect their test-tube and holder and the teacher gives out the first substance. Their partners collect the Bunsen’s and mats.
- Teaching Laboratory Classes
Laboratory classes provide students with first-hand experience with course concepts and with the opportunity to explore methods used by scientists in their discipline. Leading a laboratory session has particular challenges and opportunities that differ from those in a standard classroom environment.
Best practices to follow that can help laboratory sessions run smoothly.
Some ‘best practices’ to help the lab run smoothly while maximizing student learning–
as you prepare to conduct a lab, consider the following questions:
- Will I be able to do the lab myself before class?
- Am I familiar with the materials and equipment?
- What are the safety considerations?
- Would it help if I gave my students a handout highlighting key theoretical, procedural, and safety points?
- How can I link this lab to the professor’s lecture?
- How can I clearly communicate the criteria used in grading the lab reports?
- What kind of preparation should my students do before they come to lab?
- What tips can I give my students, so they can complete the lab successfully within the time allotted?
- Would it be helpful if I demonstrated new techniques to the students?
- How will I monitor student progress in the lab?
- Where might my students run into difficulty completing the experiment?
- What kinds of questions should I ask my students to stimulate their thinking and to encourage deeper understanding of the experiment?
- How can I help the lab pairs/groups to work together well?
Resource: (From the University of Washington’s Center for Instructional Development and Research)
During the lab:
- Establish the specific goals of the lab (write them on the board)
- Prepare an outline (on the board) of the lab activities
- Do not hesitate to explain things more than once or answer questions that you may consider simple (this will likely save you from headaches later on)
- Demonstrate new techniques to the class or small groups
- Review safety issues for the lab
- Visit with each student individually during the lab
- Ask specific questions of the students in order to monitor their progress during the lab.
- Provide ample feedback to students during the lab
After the lab: Grading Lab Reports (suggestions for providing constructive, formative feedback)
- Ensure that your grading scheme is consistent with course policy.
- Determine whether students understood the lab.
- Assess whether many students missed a critical concept.
- Evaluate whether students drew reasonable conclusions from the data they collected.
- Reward creative and rational but unconventional thought in application of principles.
- Read, evaluate and return lab reports in a timely manner with cogent feedback.
- Help students improve by telling them how they could have done better.
- Focus comments in specific areas rather than on the report as a whole.
Resource: (From the University of Virginia’s Teaching Resource Center,
http://trc.virginia.edu/Publications/Teaching_UVA/III_Lab_Teaching.htm)
What makes a good TA? In their feedback to TAs, students indicate that they appreciate lab TAs who:
- Summarize the theory and procedure briefly before the students begin the lab.
- Demonstrate new techniques.
- Relate the lab to the lecture and to real world applications.
- Are willing to help and answer questions.
- Walk around and check with students to make sure that they are making progress.
- Ask questions that make students think more deeply about what they are doing and why.
Resource: (From the University of Washington’s Center for Instructional Development and Research, http://depts.washington.edu/cidrweb/TAHandbook/ConductingLabs.html)
SAFETY IN THE LABORATORY
The prevention of accidents in laboratories is the duty of every individual using or entering in the laboratories. For a teacher, ensuring the safety of others as well as of himself is of particular importance. Clearly it is the duty of every science teacher to organize his classes in a way which reflects both his responsibility for their welfare and his commitment to teaching his pupils appropriate safety conscious attitudes and behavior.
Safety is to be regarded as a positive factor in science teaching and the teacher must therefore stress the importance of careful planning.
One of the objectives of adequate practical training in science, even at school, is to teach pupils how to handle safely materials which are potentially or actually dangerous. Even so, every teacher should make it his or her task to become familiar with these instructions:
- Get to know the layout of the laboratory of the school. (Shot of lab different views).
- Ways of getting out the building in an emergency. (Shot of ways getting out and in).
- The location of fire-fighting equipment and how it works. (Shot of the place and equipment).
- Ready access to the mains water tap in the laboratory. (Shot of the place).
- Always keep the quantities and variety of dangerous materials and apparatus not in immediate use, either in a storeroom or an cupboard. (Shot)
- Do not use wastepaper baskets or ashtrays (Shot)
- Never stand on revolving stools or chairs. (Shot)
- Great care should be taken when handling glassware. (Shot)
- Glassblowing benches should be fitted with extract ventilation to remove combustion products. (Shot)
- Solutions spilled on the bench or floor should be cleaned up immediately. (Shot)
- Do not point test-tube at other people. (Shot)
- Do not look into the mouth of a test-tube or flask whilst you are mixing.
Self Assessment Exercises 1.3
Q.1: If you have taught science and used science laboratory then tell how do you manage your students in the laboratory?
Q.2: Critically evaluate laboratory teaching practices in Pakistani Schools.


- Chapters 9
- Department Education
- Teacher
Dr. Muhammad Nadeem Anwar
